A warehouse team once asked for pixel-perfect masks around every package because segmentation sounded more advanced than detection. Two weeks into calibration, annotators were tracing shrink-wrap edges that the model would never use. Review time doubled, boundary disagreement climbed, and the first downstream experiment performed no better than a box baseline.
The expensive mistake happened before anyone opened an annotation tool: the team chose a geometry without deciding what signal the model required. The most useful way to explore Unitlab's image workbench is therefore to start with the decision a label must support, then choose the least complex geometry that preserves it.
A better image annotation program does not begin by asking how fast someone can draw a box. It begins by asking what geometric information the model truly needs, how that information will be reviewed, and what level of precision the team can maintain across thousands—or millions—of images.
Choose an annotation type that is too coarse and the model never receives the signal it needs. Choose one that is unnecessarily detailed and cost, fatigue, and disagreement rise without improving the downstream result. The image workbench in Unitlab supports a wide range of geometry, but the real value comes from matching each tool to a well-defined learning objective.
This guide uses the current Unitlab product. It walks through the Workbench, compares annotation types, explains the AI-assisted tools, and shows how to turn interface capability into a disciplined production workflow.
The live image annotation workbench
Unitlab places the image canvas at the center and keeps the annotation system around it. In the current interface, the toolbar includes pan, Magic Touch, prompt-based object detection, bounding box, cuboid, brush, eraser, polygon, skeleton, line, keypoint, crosshair, comments, image settings, undo and redo, zoom controls, and annotation shortcuts.
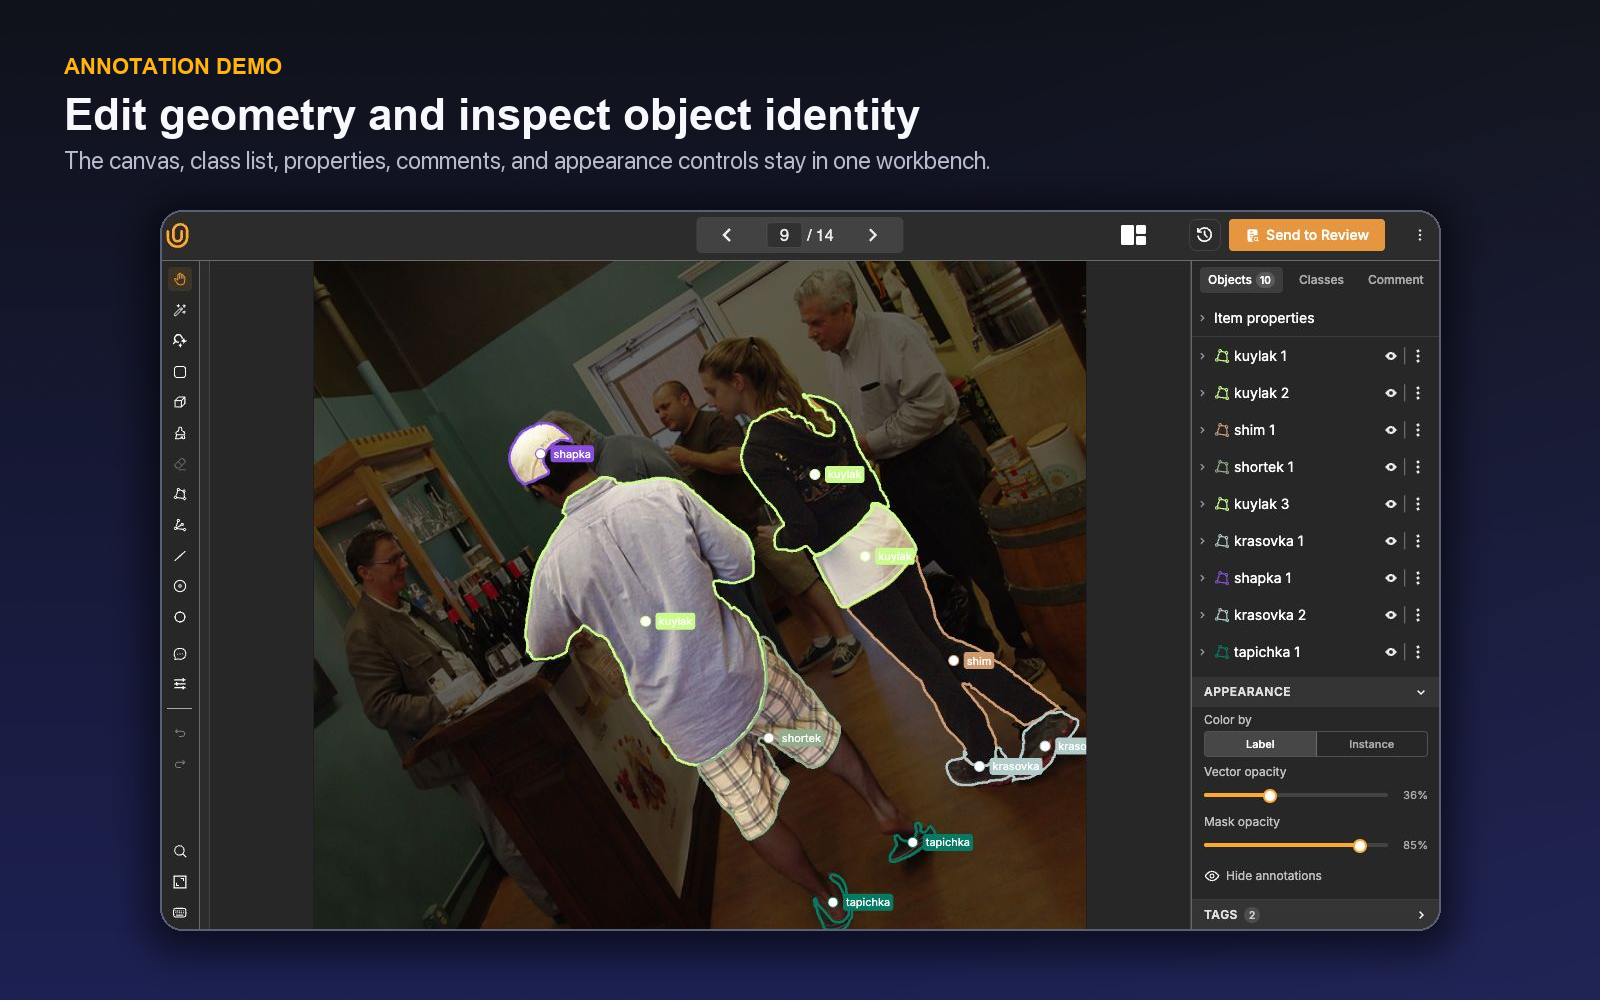
The inspector separates the work into Objects, Classes, Comments, Item properties, Tags, and Appearance. Existing objects can be selected and assigned to another class, enriched with properties or relations, reordered visually, or removed. Reordering controls include bring to front, bring forward, send backward, and send to back—small details that matter when multiple objects overlap.
Appearance controls allow a reviewer to hide annotations, adjust vector and mask opacity, and color by label or by instance. These are not cosmetic extras. A dense segmentation scene may be easier to audit at lower mask opacity, while instance coloring helps reveal accidentally merged objects.
The same project context includes item navigation, workflow history, comments, and the action appropriate to the current stage, such as sending the item to review or marking it complete. Annotation is therefore embedded in an operating process rather than isolated on a canvas.
Shortcuts and View Settings that reduce annotation friction
Press H to open the shortcut guide for the active panel. The core visual-tool shortcuts are V for pan/select, B for box, N for cuboid, F for brush, E for eraser, P for polygon, L for polyline, J for skeleton, U for keypoint, M for Magic Touch, S for Detect all objects, T for crosshair, and C for comment. Number keys 1–9 select classes assigned to those hotkeys; [ and ] change brush size; Ctrl/Cmd + Z and Ctrl/Cmd + Y undo and redo.
View Settings separates the source from the inspection experience. Annotators can adjust object names, properties and attributes, label font size, selected-object and edge opacity, handle size, keypoint sensitivity, polyshape angles, the cursor ruler, auto-zoom behavior, and image brightness, contrast, saturation, color map, or inversion. These controls improve visibility and precision without altering the uploaded image.
Choose the geometry from the model backward
The fastest annotation is the one that is sufficient—not the one with the fewest clicks.
| Geometry | Best suited to | Main strength | Quality risk to manage |
|---|---|---|---|
| Bounding box | Detection and rough localization | Fast, familiar, easy to review | Inconsistent tightness and heavy overlap |
| Cuboid | Objects where approximate 3D orientation matters | Adds perspective and volume cues | Ambiguous corners in cluttered scenes |
| Polygon | Objects with clear, angular outlines | Good contour precision with fewer points than a mask | Too many or too few vertices |
| Mask | Segmentation and precise area measurement | Pixel-level object coverage | Boundary inconsistency and hidden holes |
| Keypoint | Landmarks and pose features | Compact structural signal | Inconsistent landmark visibility rules |
| Skeleton | Connected pose or articulated structures | Encodes topology and joint relationships | Left/right confusion and occlusion handling |
| Line | Boundaries, lanes, paths, or elongated features | Direct representation of a path | Variable endpoint placement |
Bounding boxes: simple does not mean vague
Boxes remain the right choice for many detection systems. They are quick to create, easy to compare, and broadly understood. But teams still need explicit rules. Should the box include a shadow? What happens when an object is truncated by the image edge? Is a heavily occluded object labeled, ignored, or marked with a property? Are grouped objects boxed individually?
The best box guideline includes visual examples of tightness, truncation, occlusion, minimum size, and ignore regions. Reviewers should look for systematic patterns, not merely whether a box exists.
Polygons and masks: define the boundary policy
Polygons work well when contours are important but can be represented with strategically placed vertices. Masks are appropriate when the exact occupied area matters, when edges are irregular, or when small interior gaps carry meaning.
Neither tool resolves ambiguity by itself. Consider hair, motion blur, transparent materials, vegetation, smoke, reflections, or partially visible defects. A boundary policy should specify what annotators include, how they treat holes, and the level of zoom expected for final inspection.
Unitlab's brush and eraser complement mask work, while opacity controls help a reviewer compare the label with the underlying pixels. Magic Touch provides an interactive path for producing a candidate mask, which can reduce manual outlining while keeping the annotator in control.
Keypoints and skeletons: visibility is part of the label
Landmark projects often fail because coordinates are defined but visibility states are not. If an elbow is hidden, does the annotator estimate its position, omit it, or mark it as occluded? If a keypoint lies just outside the frame, is it truncated or absent?
A production ontology should make these decisions explicit through properties or project rules. Skeleton topology should also be stable. Changing the order or meaning of points after annotation begins creates costly downstream transformations.
Item-level classification and captioning
Not every image task requires spatial geometry. An image captioning or classification pattern can use item-level ontology properties and surface missing required values instead of presenting irrelevant drawing tools. This is a clean model for labels that describe the whole image: scene type, quality category, weather condition, acquisition setting, or a text response.
Build the ontology before building the queue
In Unitlab, an ontology defines the reusable schema. Detection classes can include a name, description, color, hotkey, attributes, and single-choice, multi-choice, or text properties. Relations can connect annotated objects when structure between them matters.
Good class names are short; good class definitions are precise. “Damage” may look concise, but it is not operational until a person can distinguish damage from wear, dirt, glare, or manufacturing variation. Put the decision boundary in the description and detailed examples in project instructions.
Properties are useful when one class has important substructure that should not become dozens of separate classes. A vehicle box might carry type, state, and occlusion properties. That preserves a stable primary class while producing richer training or analysis signals.
The schema can also grow in context. Select an object and choose Add property to define a required or optional single-choice, multi-choice, or text field; choice options can be reordered and can reveal nested child properties. Add attributes lets the annotator toggle an existing class attribute or create a new named attribute from the search field. Add relation connects the selected object to one or more target annotations. Whole-image fields belong under Item properties, where Add item properties creates a datasource-level question without attaching it to a shape.
Hotkeys can improve throughput once the schema stabilizes. Introduce them during calibration, not on day one, so people do not learn shortcuts for a changing class list.
Schema design rule: Create a new class when the distinction changes what is being located. Use a property when the distinction describes the state or subtype of the same located object. Use a relation when the meaning depends on another annotated object.
AI assistance as a proposal, not an exemption from review
The current image toolbar exposes three especially useful forms of assistance: Magic Touch, prompt-based detection, and Find Similar.
Magic Touch for interactive segmentation
Magic Touch is oriented around mask creation. In the live UI, activating it without an applicable class opened a class-creation dialog configured for a Mask class, including class name, color, and numeric hotkey. This reinforces the right abstraction: the model-assisted result still belongs to the ontology and should be reviewed like any other mask.
Use Magic Touch when the object has a visually coherent region but manual contouring would be slow. Inspect boundaries around thin structures, occlusions, low contrast, and adjacent objects. Measure success by corrected time per accepted mask, not by the speed of the first proposal.
Prompt-based “Detect all objects”
The separate Auto-labeling panel includes the current class, a prompt textbox, a reset-to-class-name option, and a Detect all objects action. Selecting the person class in the live workspace populated the prompt with person.
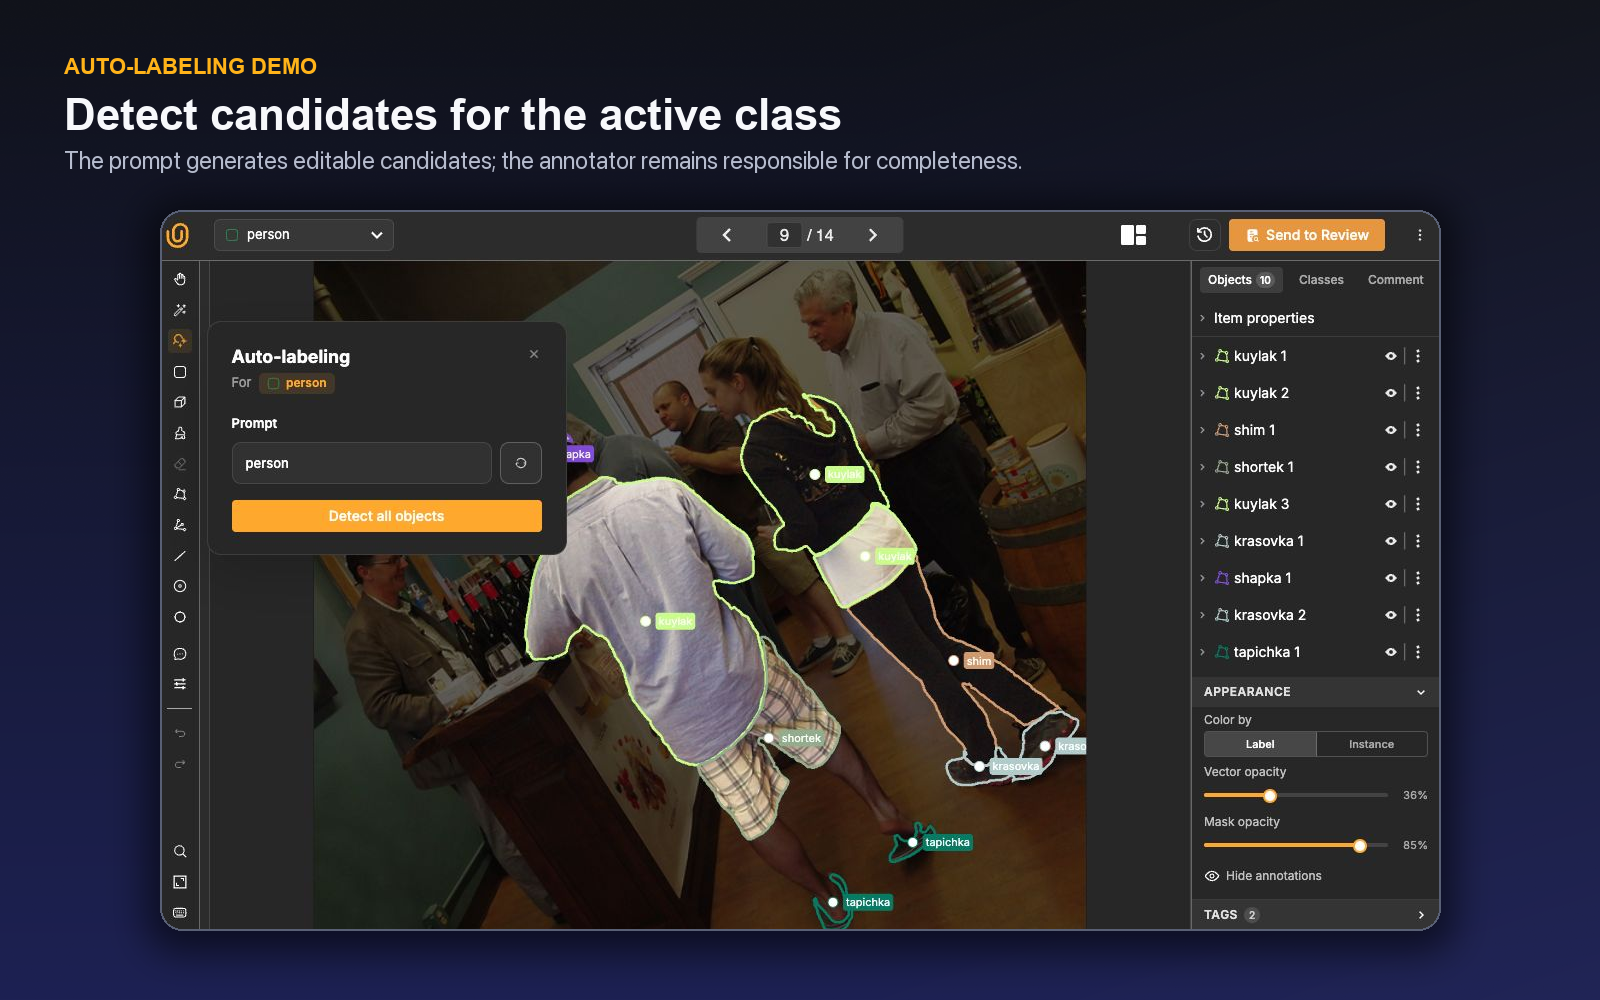
That tight connection to the selected class reduces bookkeeping. It also means class definitions and prompts should agree. If an ontology distinguishes worker from visitor, a generic “person” prompt may produce candidates outside the intended policy. Review for both missed objects and out-of-scope suggestions.
Find Similar from a trusted object
Find Similar is object-level. After an existing annotation is selected, it searches for similar objects in the current item and presents candidates with a confidence threshold plus Clear and Accept all actions. In our live test, the selected object produced zero suggestions at a 70% threshold, so nothing was accepted.
That result is a useful reminder: assistance is conditional. A reliable operating procedure must make “no useful candidates” a normal outcome, not an exception that pressures the annotator to lower the threshold until something appears.
Design the workflow around the cost of an error
A label can be geometrically valid and semantically wrong. Unitlab workflows let teams connect Project, Annotate, Review, Model, Archive, and Complete stages. A review stage supports accepted and rejected branches, which is essential when corrections must return to active work.
Not every item requires the same treatment. Consider three control levels:
- Full review for new ontologies, new annotators, high-risk classes, and difficult media.
- Targeted review for selected classes, low-confidence AI suggestions, or items with known ambiguity.
- Sampled audit for mature work where measured agreement remains stable.
The control level should respond to evidence. A team that reduces review after one good week may miss drift introduced by a new camera, new geography, or new annotator cohort. Track disagreement by class and error type so the workflow can focus attention where it changes outcomes.
Comments and project issues serve different purposes. Use an annotation comment for item-specific context. Use an issue when work needs an owner, status, and durable follow-up. Project instructions can contain rich text, external links, and uploaded files, including PDF and presentation formats, so the current guideline remains available inside the project.
A practical calibration exercise
Before a production queue opens, select 30–50 images that deliberately include clear examples, edge cases, overlap, occlusion, and poor image quality. Ask at least two annotators and one reviewer to label the same set independently.
During review, classify each disagreement:
- class selection;
- missing or extra object;
- boundary or box tightness;
- property value;
- relation;
- visibility or occlusion policy; or
- genuinely ambiguous source data.
Then change the ontology or instructions where they caused the disagreement. Do not solve every inconsistency by telling annotators to “be more careful.” If skilled people interpret a rule differently, the rule is part of the problem.
Repeat the exercise after introducing Magic Touch or prompt detection. Compare total correction time, missed-object rate, false proposals, and reviewer effort with the manual baseline. An AI tool earns its place when the completed, reviewed unit becomes cheaper or better—not simply when more shapes appear quickly.
The image annotation QA checklist
Before marking an item complete, an annotator should be able to answer:
- Did I inspect the entire image at an appropriate zoom?
- Did I apply the inclusion, truncation, and occlusion policy consistently?
- Are all required properties present?
- Are overlapping objects separate where the ontology requires instances?
- For masks, did I check edges, gaps, and thin structures?
- For keypoints, did I apply visibility rules rather than guess silently?
- Did I review every AI-generated candidate and look for objects the model missed?
- Does an unusual case need a comment or issue?
Reviewers should add a second layer: compare similar items for consistency, watch for class imbalance in errors, and distinguish isolated mistakes from a guideline problem.
Walk one difficult image from evidence to approval
Consider a warehouse image containing a partially occluded pallet, shrink-wrapped cartons, a forklift passing in front, and a worker whose safety vest blends into the background. A weak annotation plan starts by choosing the most detailed geometry available. A production plan starts by writing the decisions the model actually needs.
If the model must count pallets and estimate occupied floor area, a rotated box or polygon may be enough; tracing every slat adds cost without improving the target. If the model must detect damaged wrapping, the wrapping defect may need its own polygon or mask because the relevant evidence is a region on the pallet, not another pallet class. The worker is a separate instance, while vest_status is a property. If the worker interacts with the forklift, a relation can record that connection without folding the interaction into a long class name.
Open the image at fit-to-screen, scan it systematically, and create the large, unambiguous objects first. Zoom into boundaries only when the geometry requires it. Unitlab's appearance controls—label or instance coloring, vector opacity, mask opacity, boundary thickness, and temporary hiding—help separate “I cannot see the source” from “the annotation is wrong.” For dense scenes, hide completed categories temporarily, then restore everything for the final completeness pass.
Now test assistance. Use prompt-based detection for the repeated, visually stable class, or Find Similar from a trusted seed. Treat the returned shapes as a candidate set, not as the finished item. Search specifically for the failure modes the model is likely to share: small distant cartons, truncated instances at the image edge, unusual packaging, and objects behind glare. When a mask would otherwise take many contour edits, use Magic Touch and compare accepted-mask time with a manual polygon baseline.
The reviewer should not merely redraw the visible error. They should identify why the error occurred. A missed pallet may indicate an incomplete scan pattern. A loose box may indicate an unclear tightness rule. A wrongly accepted assisted proposal may indicate automation bias. A disputed vest_status may need not_visible as a controlled option. Each category points to a different remedy: correct the item, revise the instruction, change the ontology, or adjust where assistance is used.
Finish by viewing the image with every annotation visible, then with one class at a time. Confirm instance separation, required property completion, relations, and edge cases. Send the item to Review with a comment only if the source is genuinely unusual; create an issue when the case exposes a reusable policy problem. That distinction keeps the annotation record useful without turning every hard image into an untracked exception.
This single-image rehearsal produces an operational artifact the team can reuse: a geometry rule, an assisted-labeling rule, a review rubric, and a set of examples that show where the policy changes. Once those are stable, speed improvements come from repetition and shortcuts rather than from asking annotators to improvise faster.
A production pilot for one image class
Choose 100 images that represent the class's real difficulty: different sources, scales, lighting, overlap, occlusion, truncation, rare subtypes, and target-free negatives. Split them into a calibration set and an untouched acceptance set. Do not let the team choose only images where the preferred geometry looks good.
Have two annotators label the calibration set independently with the proposed class, geometry, properties, and relations. Run one manual path and one assisted path where Magic Touch, Detect all objects, or Find Similar is relevant. Review every item and classify differences as missing object, false object, class, geometry, property, relation, source ambiguity, or instruction ambiguity.
Use those findings to revise the schema and instructions. Add paired examples showing accepted and rejected boundaries. Specify object inclusion, smallest useful size, edge truncation, visible-versus-inferred extent, and uncertainty. If a property is often unobservable, create a controlled value; if a property changes what is located, reconsider whether it should be a class.
Now annotate the untouched acceptance set under the revised policy. Measure accepted objects per hour, reviewer correction, missed-object rate, severe boundary errors, required-property failures, and source-specific performance. Compare the complete reviewed effort of manual and assisted paths.
Set a release rule by class and condition. A stable box class may use sampled review; a new thin-structure mask may require full review; an assisted path may be enabled only for coherent instances. Record the rule in project instructions and the workflow. Retest when the camera domain, ontology, assistance, or annotator cohort changes.
This pilot produces a defensible answer to the central question: which representation creates the least reviewed cost while preserving the signal the model needs? Without that evidence, teams often optimize annotation speed and discover the geometry mistake only after training.
Try the workflow in Unitlab
- Clone an image demo or open a representative image project, then review the attached ontology before drawing anything.
- Select one class and create the same object with a box, polygon, or mask only where the ontology and task allow that comparison.
- Use opacity and color-by-instance controls to inspect overlap and boundary quality. Add the properties or relations that express meaning the geometry cannot.
- Test one assisted path—Magic Touch, prompt-based detection, or Find Similar—and record corrections, misses, and zero-result cases.
- Send the item through Review and classify the correction as semantic, geometric, missing, duplicate, or property-related.
The useful benchmark is accepted objects per hour at the required quality, segmented by class and geometry. Proposal speed alone hides the cost of correction.
The decision to make
Pick one costly image class and test it in Unitlab with the simplest plausible geometry and a stricter alternative. Let reviewed model performance—not visual sophistication—choose the winner.
Explore related Unitlab capabilities: image annotation for computer vision and enterprise data annotation workflows.
Continue in the Unitlab documentation: Image annotation.