Bounding boxes are a staple in object detection. These rectangles help machines identify and classify objects by outlining them in an image. You've likely seen demos with boxes drawn around cars, people, or animals. They're simple, intuitive, and easy to visualize.
Car Auto Detection | Unitlab Annotate
But what happens when the object isn't neatly aligned? That's where rotated bounding boxes come in.
Why Rotating Boxes, Essentially?
By default, bounding boxes are aligned with the x and y axes. This works fine when objects are upright or parallel to the image frame. But the real world isn't that tidy. Objects appear at all angles: cars parked diagonally, ships at sea, or tilted text in scanned documents.
In these situations, axis-aligned boxes don't fit well. They include a lot of unnecessary background, reduce accuracy, and can confuse your model. Rotated bounding boxes solve this by allowing you to tilt the box to match the object's orientation.
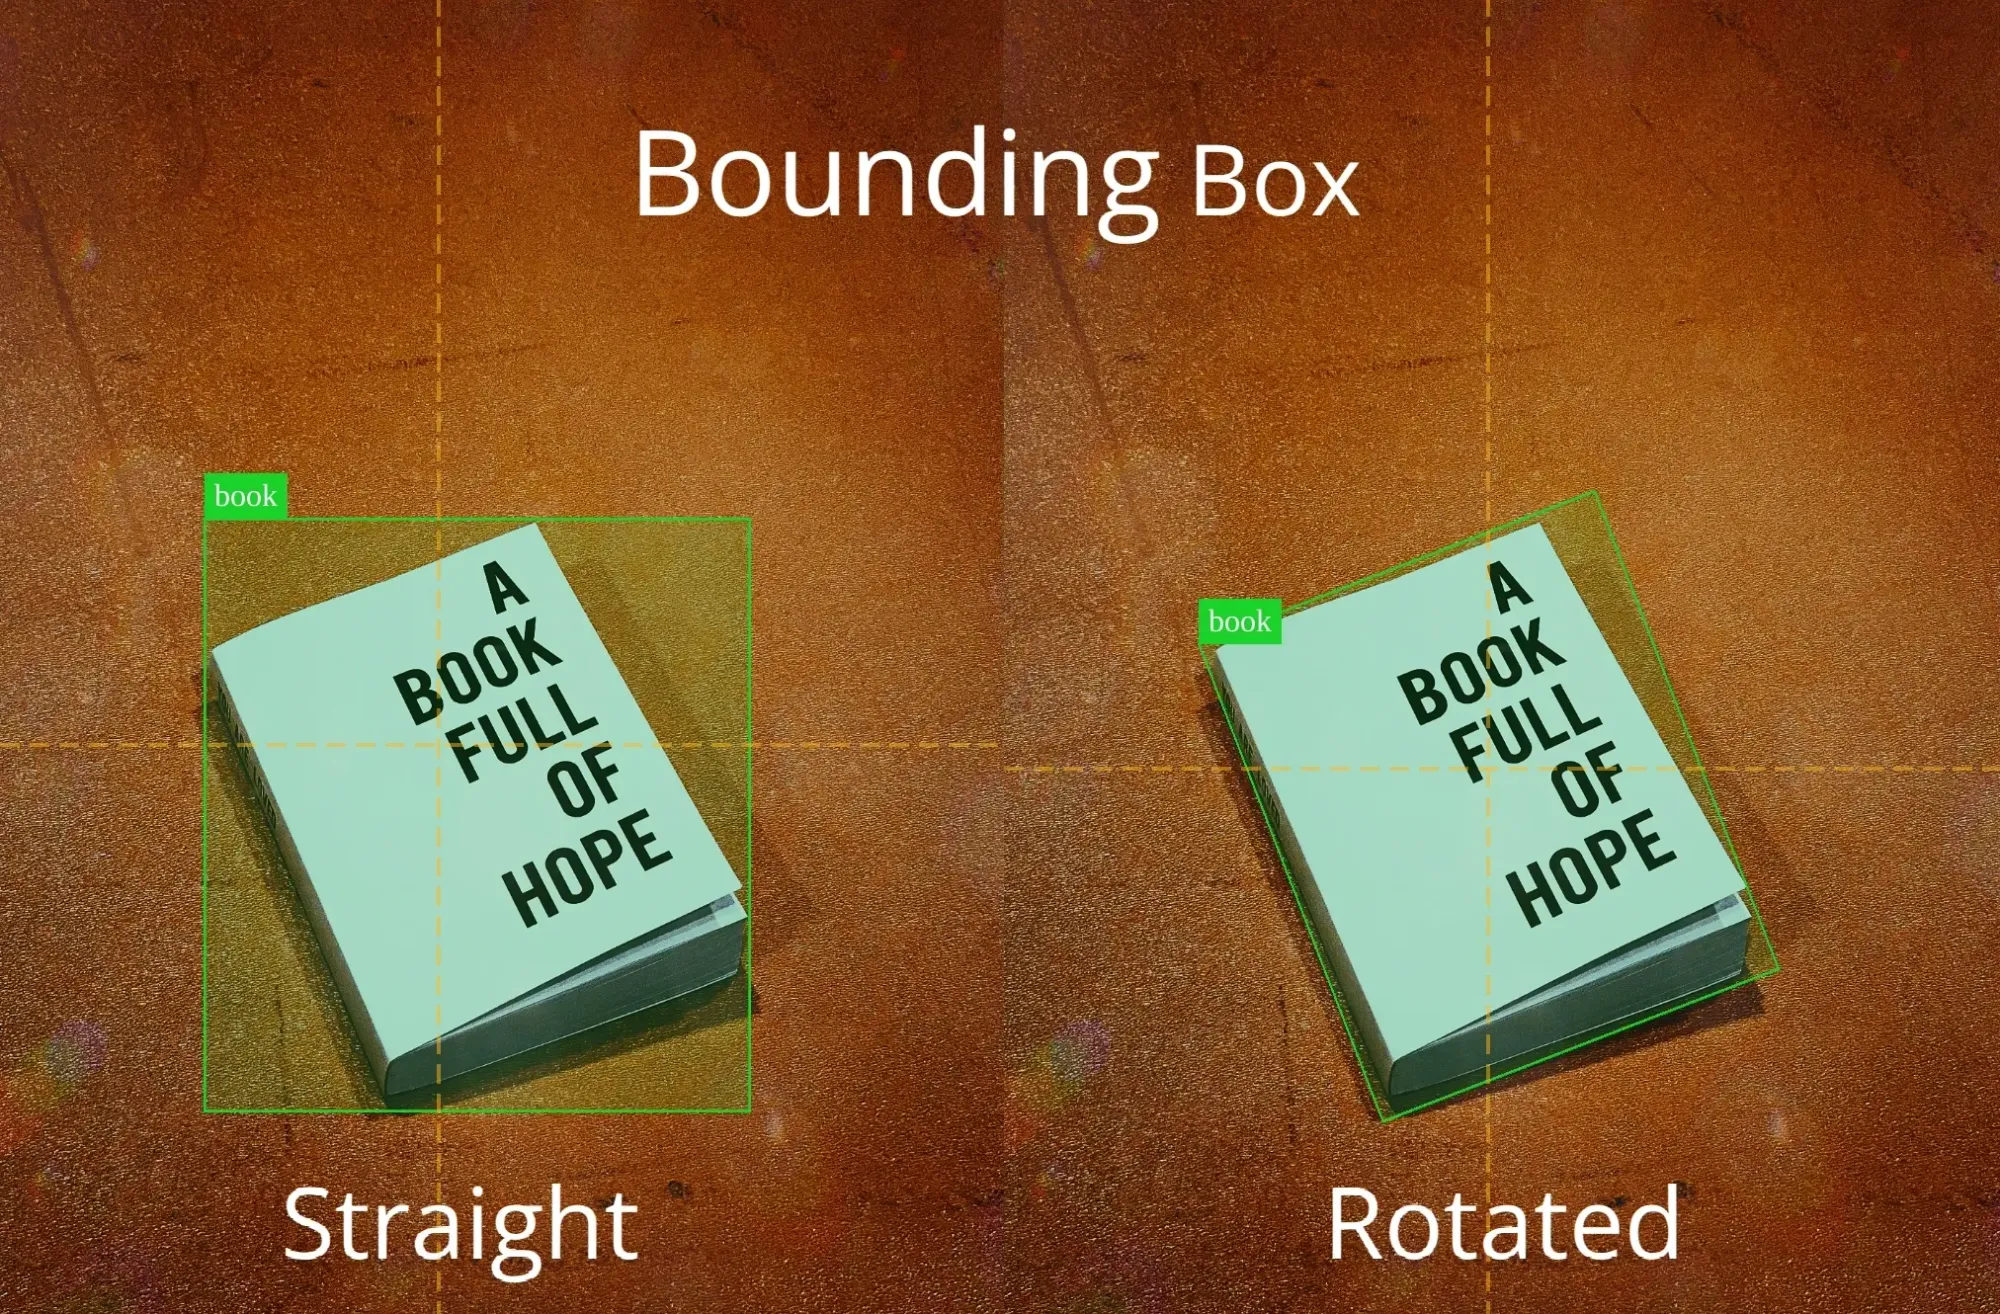
This brings two major benefits:
- Better Accuracy: The box fits the object more precisely.
- Less Noise: The model doesn't have to process irrelevant background around the object.
Understanding Bounding Boxes
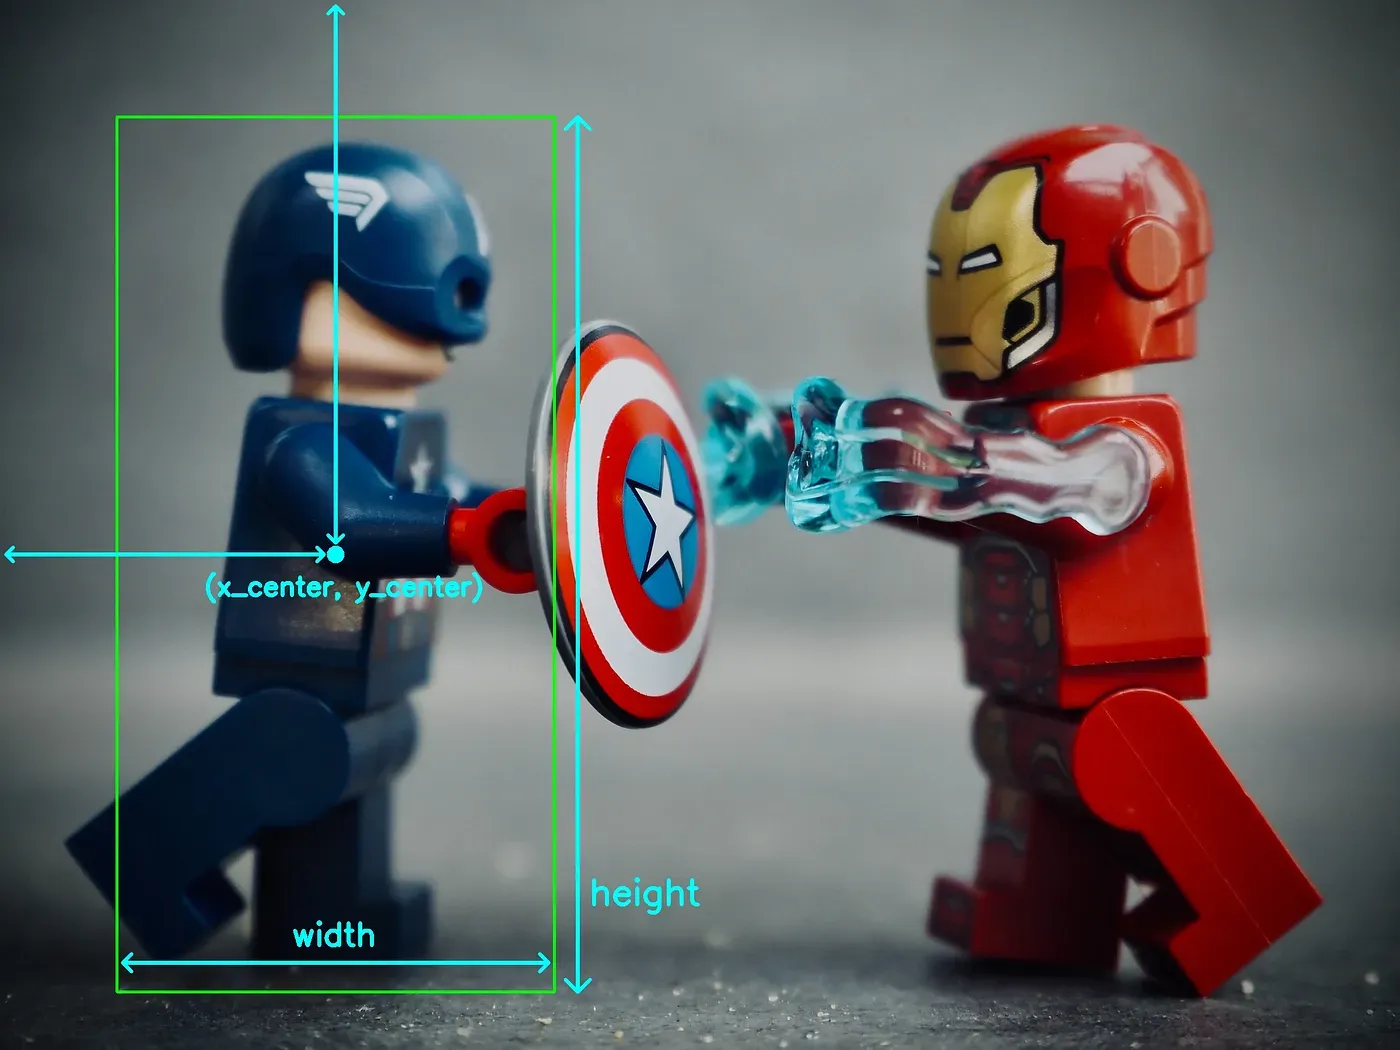
At their core, bounding boxes are just rectangles defined by a set of numbers. Depending on the format, those numbers vary:
- COCO format: Top-left x and y coordinates, width, and height.
- PASCAL VOC: Top-left and bottom-right corners.
- YOLO: Center x and y, width, and height (all normalized).
Let’s walk through a quick YOLO example:
Say you have:
- Center: (640, 540)
- Box size: (720, 810)
- Image size: (1600, 1200)
Normalized, the box becomes:
- x = 640 / 1600 = 0.4
- y = 540 / 1200 = 0.45
- width = 720 / 1600 = 0.45
- height = 810 / 1200 = 0.675
So, the final YOLO box: [0.4, 0.45, 0.45, 0.675]
Rotating Bounding Boxes
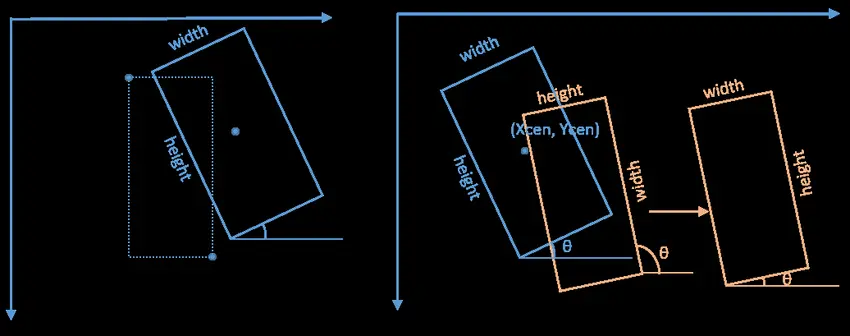
As mentioned above, ordinary bounding boxes operate on the premise that rectangles are axis-aligned. To allow a box to rotate, we add one more value: the angle θ (theta). So, the full set becomes:
- x (center x)
- y (center y)
- w (width)
- h (height)
- θ (angle, usually from -90° to 90°)
An angle of 0° means the box is horizontal. A 45° angle means the box is rotated counterclockwise by 45°. -45° means it's rotated clockwise, as in trigonometric circles.
If you're rotating points in code, you often use a rotation matrix involving sin and cos of the angle. For example, to rotate the top-left corner of a box by 45°, we first find the normalized coordinates of that point and rotate it using the rotation matrix:
- top_left_x = (640-360)/1600 = 280/1600 = 0.175
- top_left_y = (540-405)/1200 = 135/1200 = 0.1125
Rotating by 45 degrees in trigonometry means we're taking the top_left point and moving it along a circular path centered at the origin (0, 0), such that the line connecting the origin to the point makes a 45-degree counterclockwise turn. To calculate the new point, we can use the matrix to simplify calculations:
We multiply the rotation matrix by the original vector coordinates:
[ cos(45)° -sin(45)° ] [ 0.175 ]
[ sin(45)° cos(45)° ] [ 0.1125 ]
We then calculate the two matrices and get the 2x1 matrix, which represents the new, rotated x and y coordinates, respectively.
[ (√2/2)*0.0625 ]
[ (√2/2)*0.2875 ]
Simplicity in Theory, Complexity in Practice
The idea of rotating a box sounds simple. Just add an angle, right?
In practice, it gets complicated:
- Labeling: Drawing and rotating a box manually takes more time. Annotators have to be more precise due to angles.
Rotating Bounding Boxes | Unitlab Annotate
- Model Design: Most object detection models are built to handle four values. Adding a fifth (angle) means rethinking how the model predicts, and how it calculates loss.
- Training Data: You can’t rely on standard flips and crops for augmentation. You need to rotate your images and boxes consistently.
- Post-Processing: Non-maximum suppression (NMS), which removes duplicate predictions, becomes harder when boxes are rotated at different angles.
Despite these challenges, rotated boxes can dramatically improve detection in fields where objects aren't neatly aligned. One such example is aerial imagery, as shown in this research paper.
When and Where to Use Rotated Bounding Boxes
Rotated bounding boxes shine when object orientation varies. Some common use cases:
- Aerial and Satellite Imagery
- Application: Detecting buildings, ships, and vehicles.
- Rationale: Objects often appear at arbitrary angles due to camera perspective.
- Autonomous Driving
- Application: Tracking angled cars, pedestrians, and signs.
- Rationale: The dynamic nature of road scenes introduces a variety of orientations.
- Maritime Surveillance
- Application: Identifying vessels from above.
- Rationale: Natural motion and changing viewpoints result in frequent orientation shifts.
- Manufacturing & Warehousing
- Application: Detecting items on conveyor belts, even when rotated.
- Rationale: Products may be misaligned or arbitrarily placed.
As usual, using rotated or axis-aligned bounding boxes ultimately depends on your particular use case. if everything in your dataset is already upright, you might not need rotated boxes. Otherwise, in scenarios with considerable rotation, the accuracy improvements often justify the additional complexity.
Essentially, considering all the relevant factors of your model, you are better served by asking,
Is the boost in accuracy worth the extra effort?
Demo Annotation Project
To illustrate the labeling process of the rotating bounding boxes, we are going to create a project and annotate cars using rotating rectangles within the context of Unitlab Annotate, an automated data annotation platform. Get started for free by creating an account below:
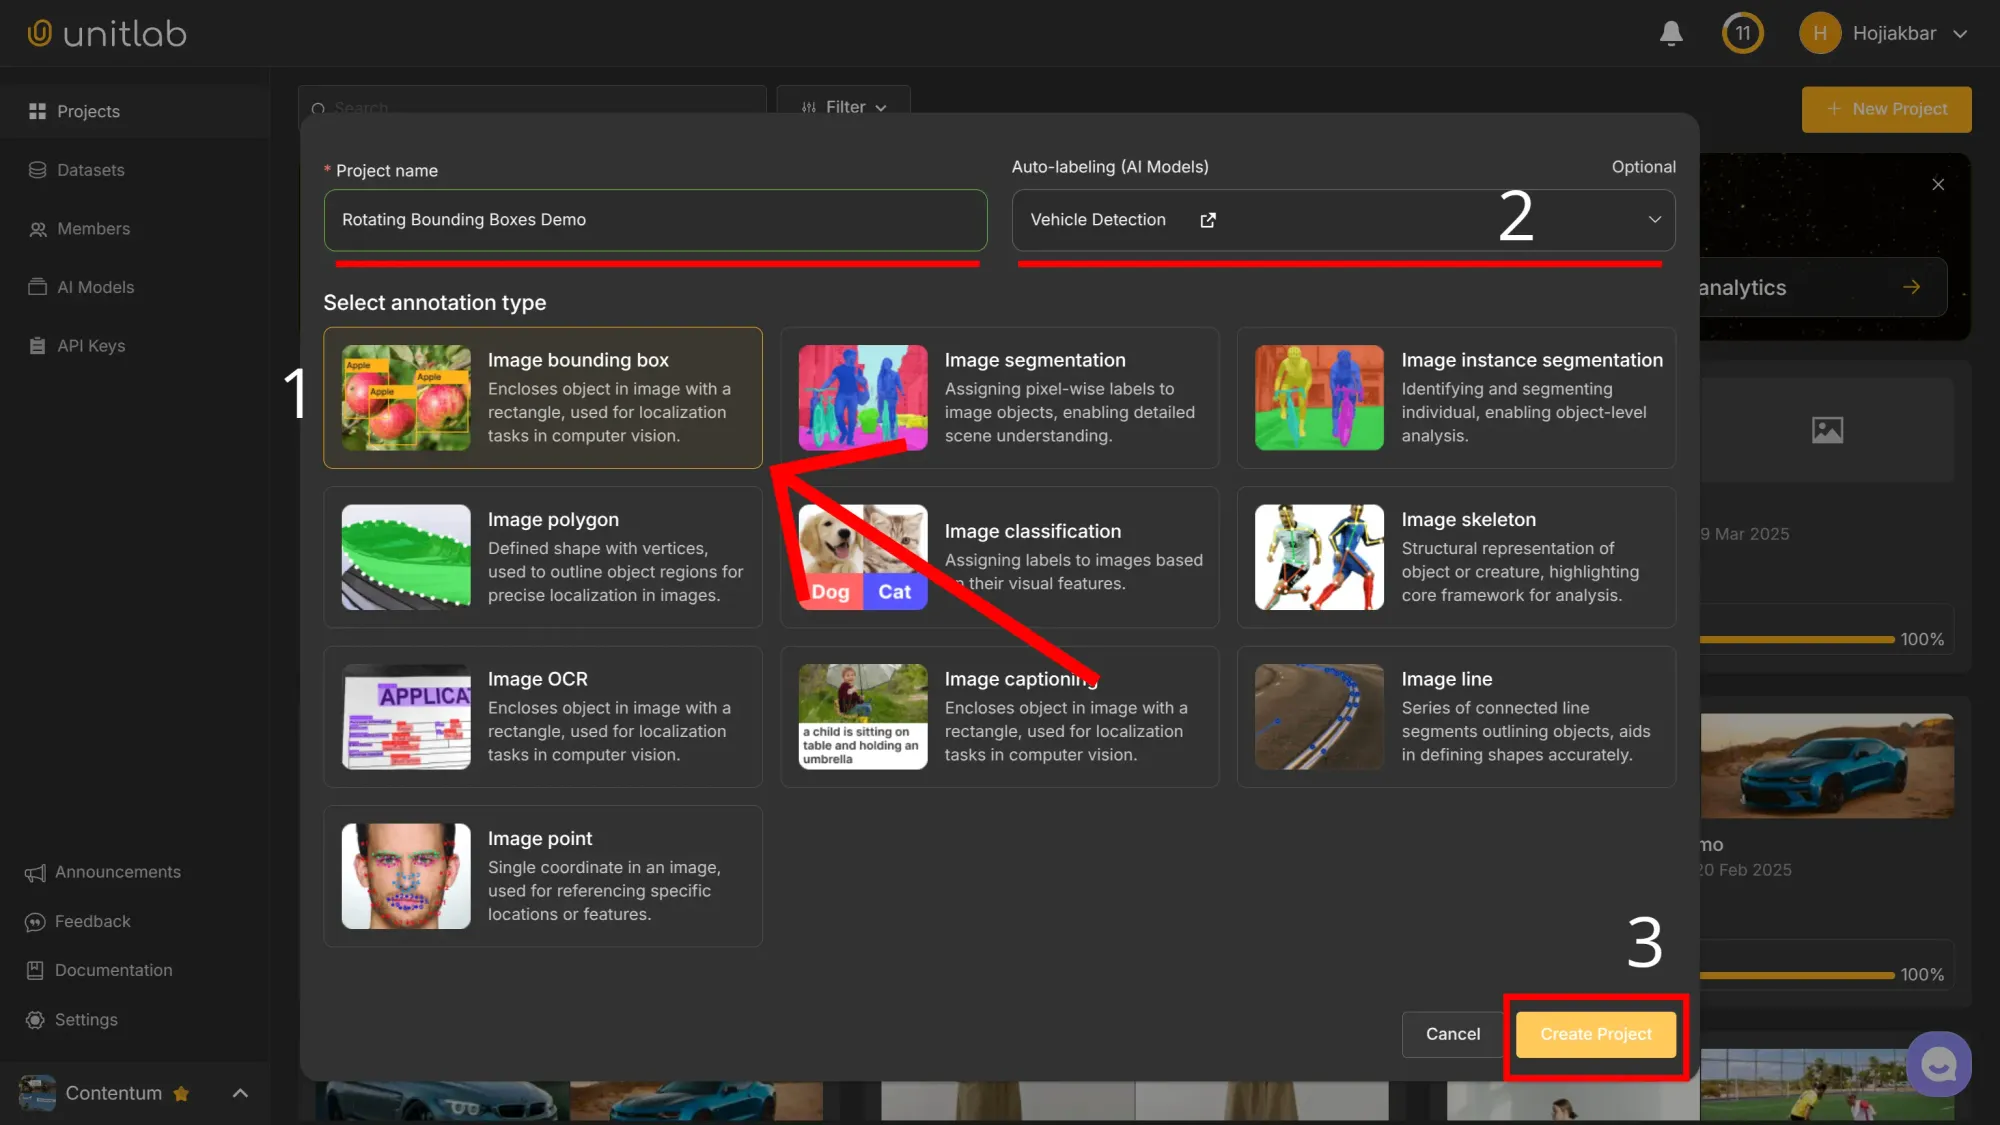
Step 1: Project Setup
Go to Unitlab Annotate, create a project named Rotating Bounding Boxes Demo, select Image Bounding Box as the annotation type, and choose the Vehicle Detection AI model to auto detect vehicles:
Next, upload the sample vehicle images and assign them to annotators. The demo images are available here.

By default, the AI model comes with the car class. For this demo project, we do not need to assign any other classes.
Step 2: Data Labeling
The easiest and fastest way to label images with rotating rectangles is to first draw a rectangle around the object and rotate it as necessary:
Rotating Bounding Boxes Manually | Unitlab Annotate
To speed up workflows, we can use the Crop Auto-Annotation tool, which automatically detects objects and draw rectangles. It is available because we have chosen a foundational AI model while configuring the project. If you have your own model, you can integrate it into Unitlab Annotate.
Finally, if you have a lot of data that you need to annotate, you can take advantage of Batch Auto-Annotation, which can annotate a large number of images in a split of a second using a provided AI model:
Batch Auto-Annotation for Object Detection | Unitlab Annotate
Then, we can rotate the bounding boxes.
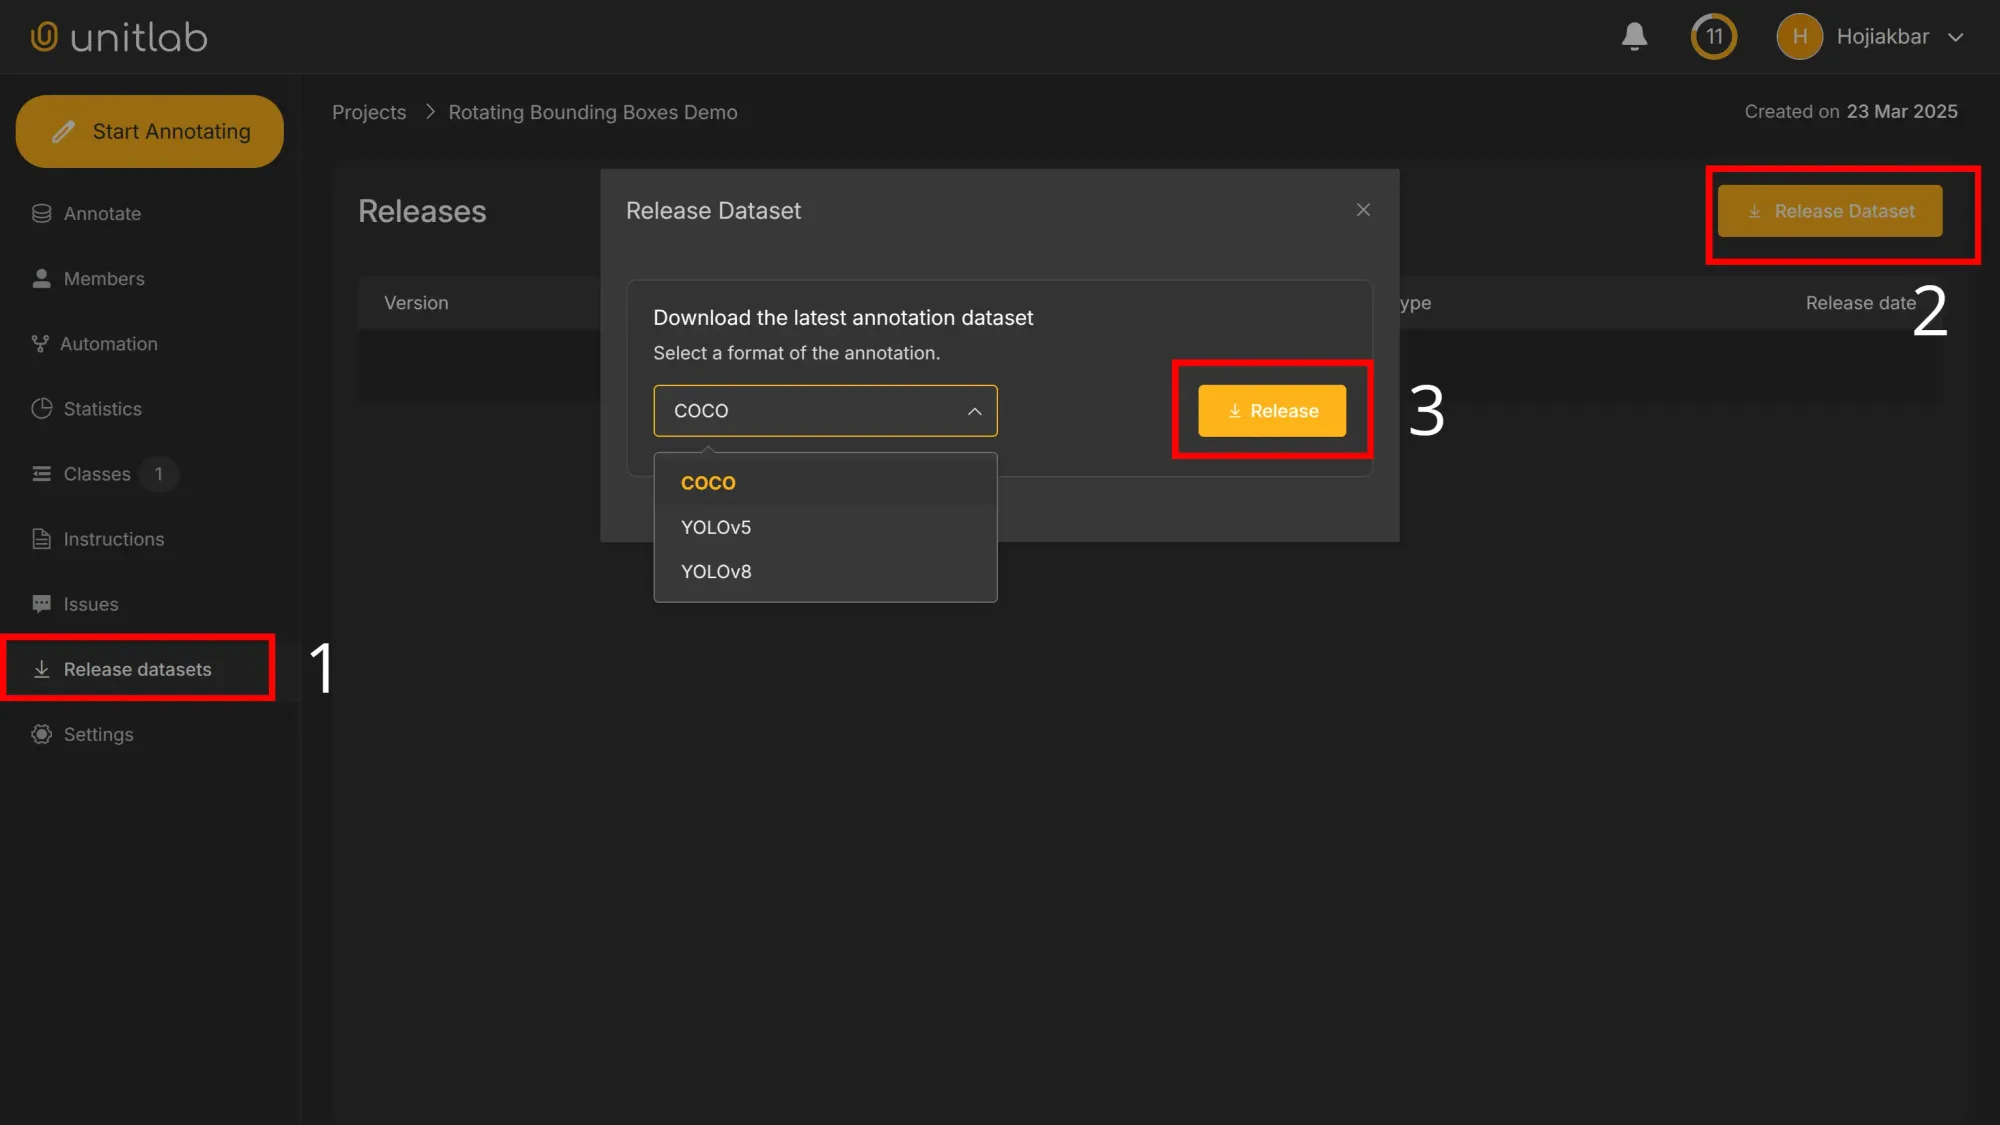
Step 3: Dataset Release
You can release an initial dataset (version 0.1) for training your computer vision model even though data labeling is not fully complete. Waiting until all images are annotated would beat practicality. Also, you are likely to add and annotate new images for testing and validation. In our case, we release an initial dataset that has been fully labeled. As we work on our model, we will add and label new source images and release another version of our dataset. The platform has full versioning control features to track changes and dataset versions.
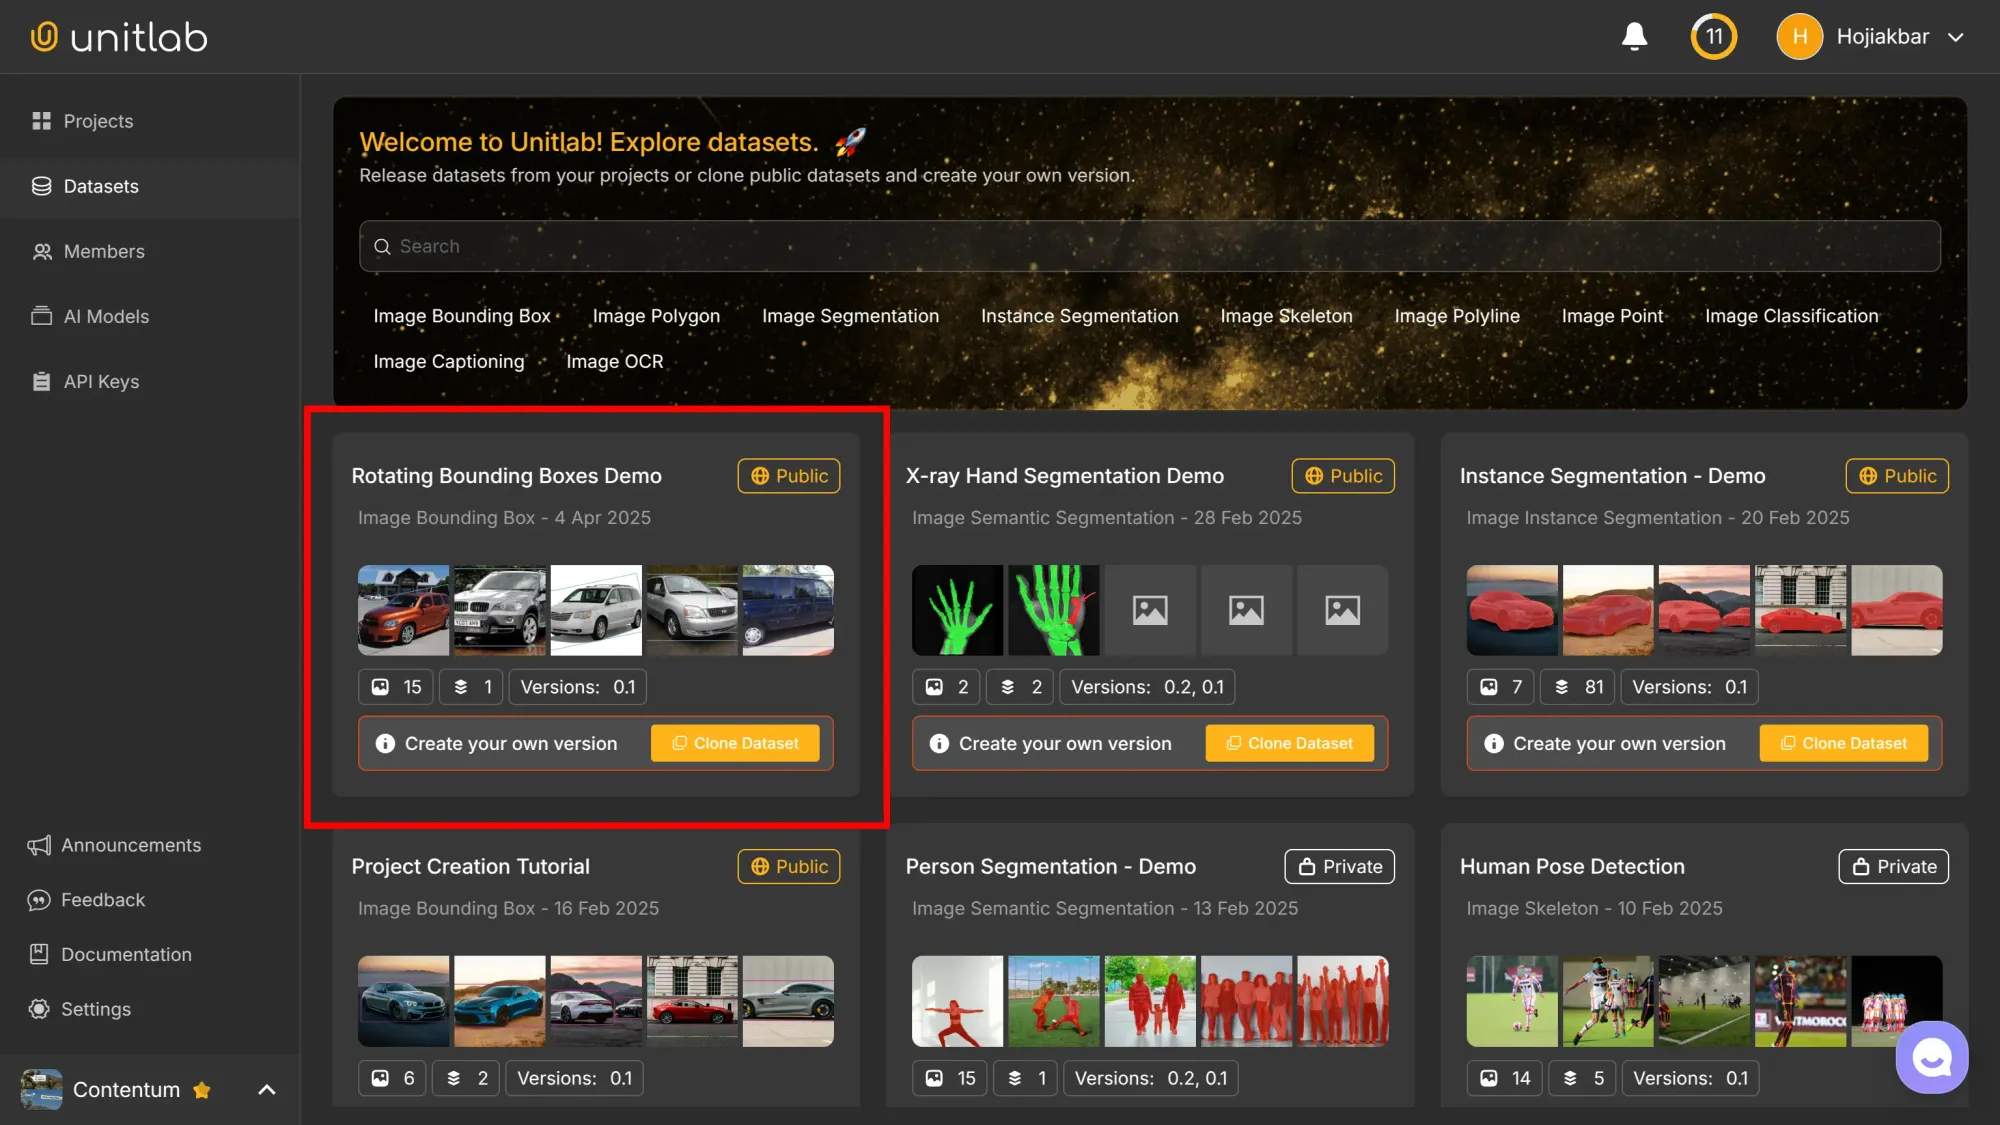
Go to Release Dataset within the project and release a dataset by choosing COCO as the dataset format:
Under the free plan, released datasets become publicly accessible through Unitlab Annotate for usage, download, or cloning. Upgrade to a paid plan to have private datasets:
Refer to this tutorial for more on AI dataset management and best practices in dataset version control, within the context of Unitlab Annotate:

Dataset Management | Unitlab Annotate
Conclusion
Rotated bounding boxes help you label objects that aren’t perfectly aligned, something that happens a lot in the real world. They take more time to annotate and train for, but they often lead to better results.
If your data has lots of rotated objects (like satellite photos, scanned documents, or warehouse shelves) they’re usually worth it. And with tools like data auto-labeling platforms, it’s getting easier to use them.
To illustrate the data annotation phase with rotating bounding boxes, we created a tutorial for you that shows several ways of labeling objects with oriented rectangles. Try it yourself for hands-on exposure.
Explore More
Check out these resources to learn more:
- Bounding Box Essentials in Data Annotation with a Demo Project
- Guide to Object Detection with a Python Demo [2026]
- Practical Computer Vision: Parking Lot Monitoring with a Demo Project
References
- Inna Nomerovska (Jun 30, 2022). 5 Industry Use Cases for Rotating Bounding Boxes. Keymakr Blog: Source
- Inna Nomerovska (Sep 8, 2022). Benefits and industrial benefits of using rotating bounding boxes for object detection. Keymakr Blog: Source
- Rajdeep Singh (Jan 17, 2024). A Quick Reference for Bounding Boxes in Object Detection: Medium: Source
- Yi Zhang et al. (Nov 2019). SARD: Towards Scale-Aware Rotated Object Detection in Aerial Imagery. ResearchGate: Source